FolioVista Books Free Sample
Chapter 2: Linux VPS Hardening Baseline
Practical Layered Security for Small Platforms
This standalone sample focuses on Chapter 2, introducing a Linux VPS hardening baseline for safer remote administration and SSH-aware change sequencing.
This standalone Chapter 2 sample covers Linux VPS hardening baseline, SSH-safe sequencing, and the initial hardening controls that small digital platforms may still need even when the public website is hosted elsewhere.
Chapter 2
Linux VPS Hardening Baseline
A practical baseline for reducing avoidable Linux VPS exposure while preserving safer SSH access and avoiding self-lockout.
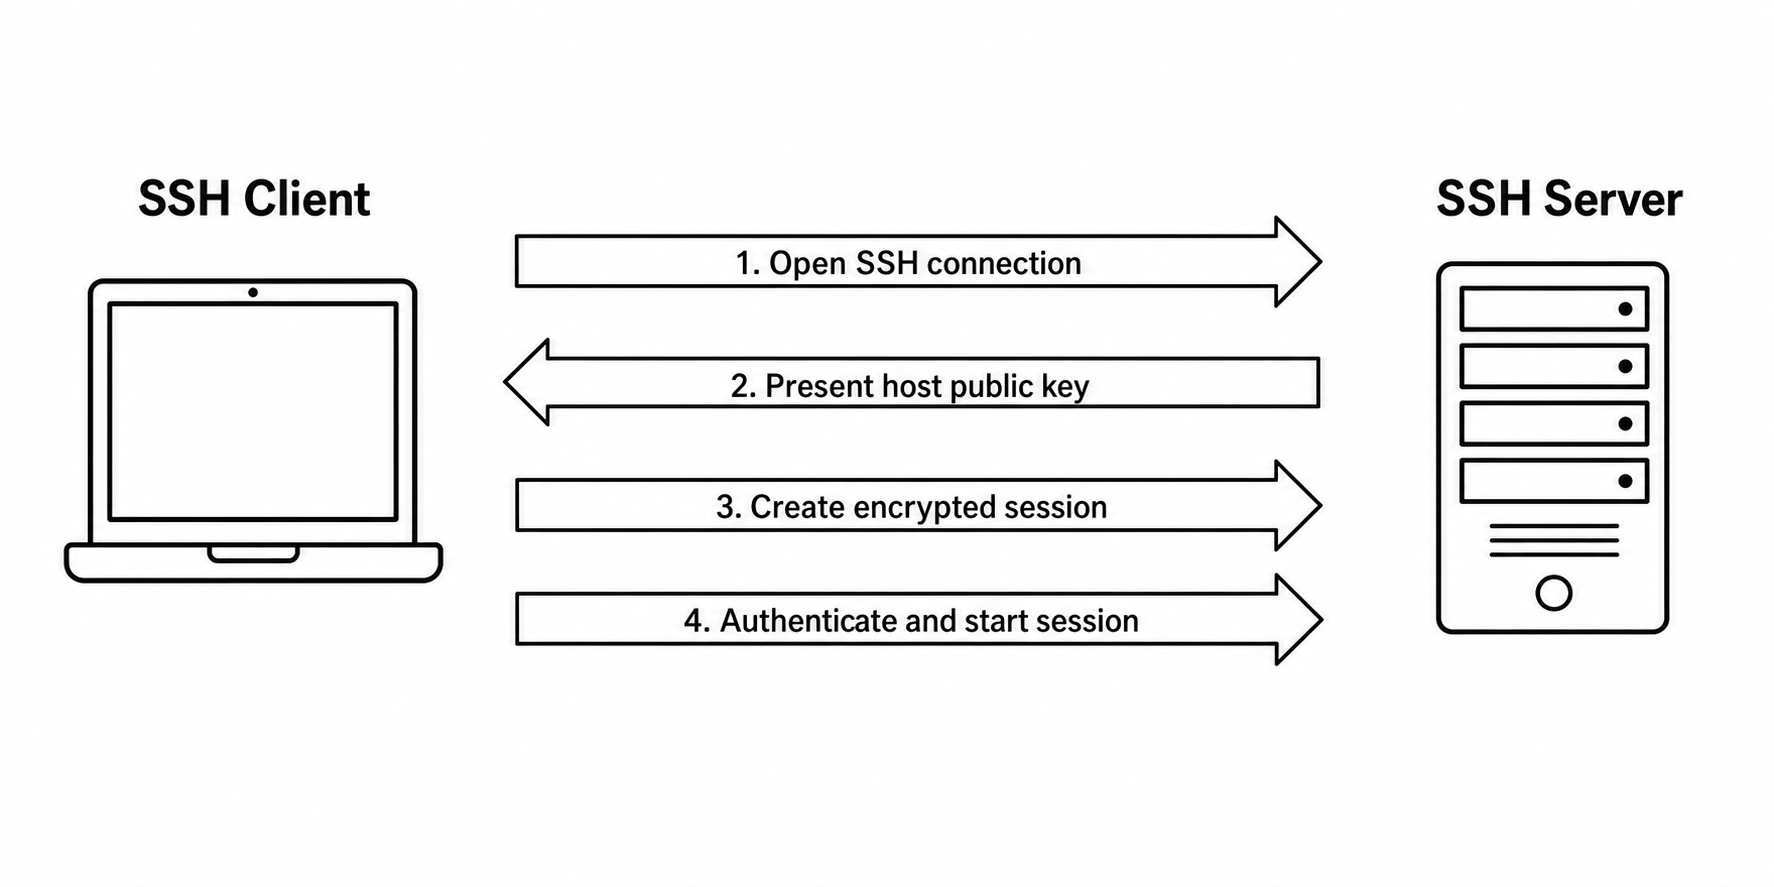
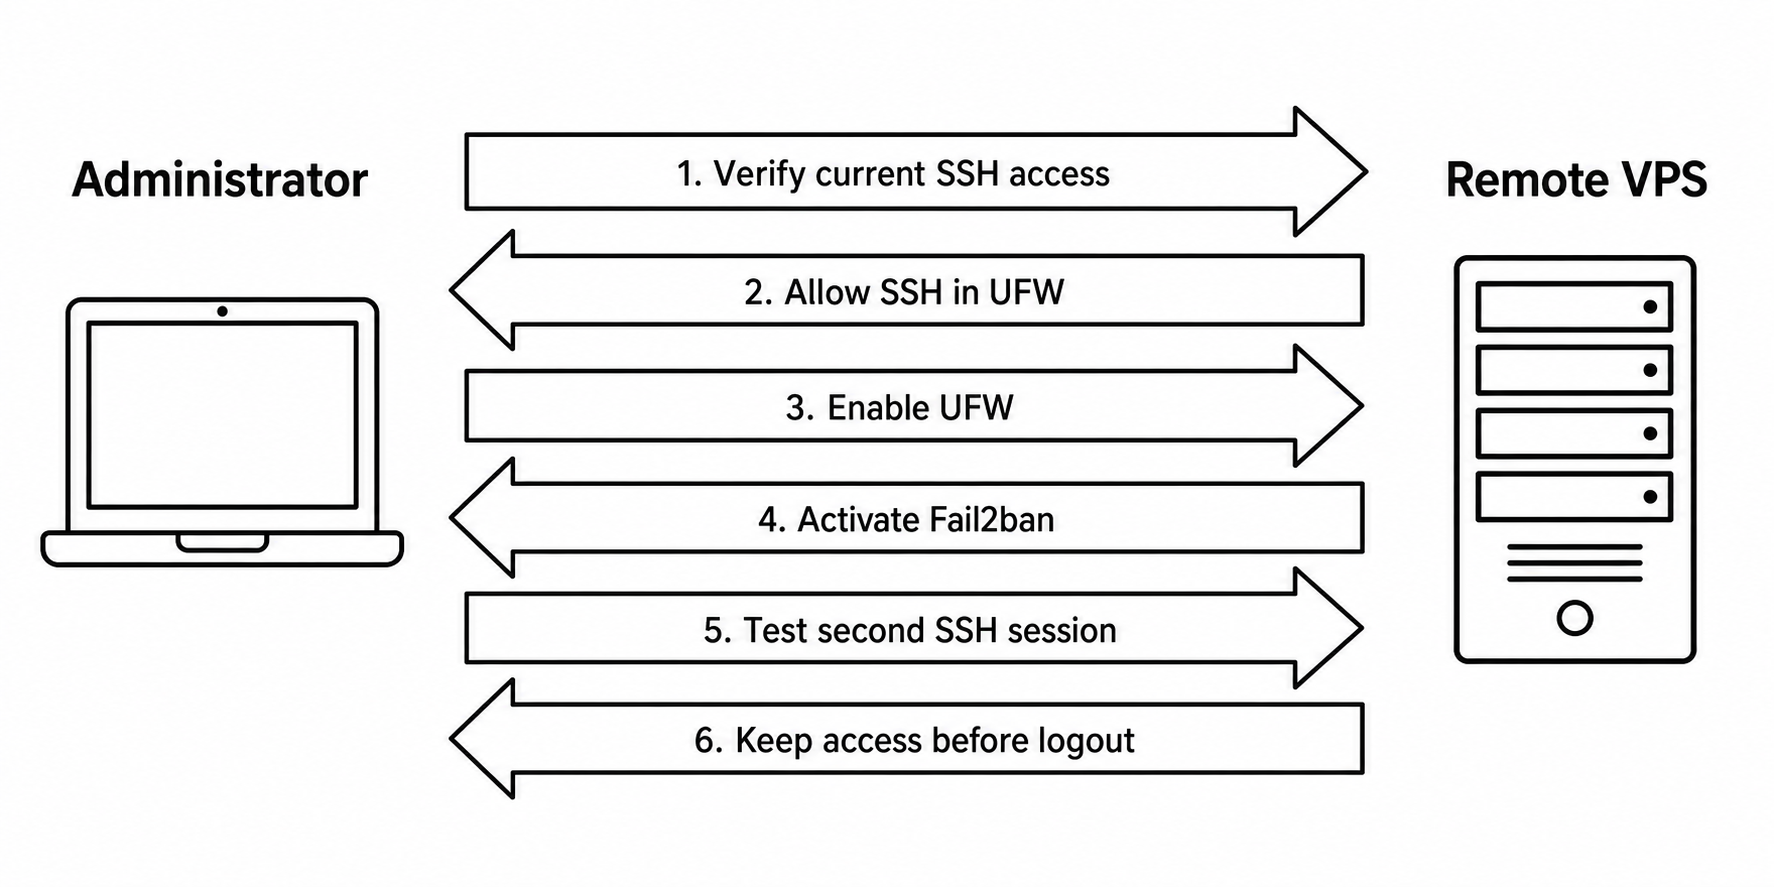
Figure note
The two SSH figures serve different purposes and work best as a pair. The compact SSH diagram establishes the access context. The hardening-sequence diagram shows the lockout-aware change order. In practical terms, the reader sees both the connection model and the safer implementation sequence before touching firewall or Fail2ban settings.
Objective
Establish a safer remote administration baseline for a Linux VPS without creating unnecessary lockout risk.
Preface: VPS vs Ready Hosting Platforms
This chapter does not argue that every website should run on a VPS. In many cases, a ready hosting platform such as Vercel, a managed or shared Hostinger plan, or a managed WordPress setup is the safer and faster starting point for a small business website.
Using a VPS can be useful because:
- it gives full control over the operating system, network rules, and server services
- it allows custom tooling, background jobs, self-managed applications, and non-standard deployment patterns
- it makes direct server-level inspection possible for logs, SSH access, local firewall rules, and service behavior
Using a VPS also creates extra responsibility because:
- the operator becomes responsible for patching, firewall rules, SSH safety, monitoring, backups, and recovery planning
- configuration mistakes can expose ports, weaken remote access, or create self-lockout
- day-to-day maintenance and incident handling require more time and technical discipline
Using a ready hosting platform can be useful because:
- deployment is usually faster for content sites, landing pages, catalogs, and standard web applications
- TLS, CDN behavior, scaling boundaries, and much of the hosting maintenance are handled by the provider
- the chance of damaging the environment through low-level server mistakes is usually lower
Using a ready hosting platform also has limits because:
- the operator has less control over the underlying system
- custom daemons, unusual network services, or deep operating-system changes may not be supported
- some advanced workflows depend on higher paid plans or a different infrastructure model
In practical terms, if a platform mainly needs a public website, book catalog, contact flow, and standard content delivery, a ready hosting platform is often the better default. A VPS becomes more justified when the business truly needs custom services, direct server control, internal tooling, or special operational requirements. This chapter focuses on the moment a VPS is already part of the environment and therefore must be hardened responsibly.
Why This Chapter Matters
Small digital platforms often rely on managed hosting for the public website, but that does not remove the need for disciplined server hardening elsewhere. A VPS may still be used for administration, support tooling, backups, internal services, testing, or future platform expansion. If that server is left close to a default state, it may become an easier entry point than the public website itself.
In practical terms, that can mean weak SSH protection, unnecessary open ports, loosely controlled internal tools, or poorly protected backup and administration services. Even if the public site is hosted on a managed platform, one neglected VPS can still create avoidable risk for the broader business.
This chapter introduces a practical baseline. The goal is not to make the server perfect in one pass. The goal is to reduce obvious exposure, preserve safe administrator access, and leave the system in a state that can be checked and maintained.
Problem
A default Linux server setup often exposes more than necessary. Services may be running without clear review, firewall rules may still be loose or absent, and SSH may be protected only by habit rather than a deliberate hardening sequence.
This is where many operators make one of two mistakes:
- they leave the server too open for too long
- or they harden it too quickly and lock themselves out
The safer approach is a measured baseline with immediate validation after each step.
Terminology
SSH
Secure Shell. A protocol commonly used to access and administer a remote server securely over the network.
Shell
A command-line interface used to interact with the operating system by running commands, scripts, and administrative tasks.
IP
Internet Protocol. A system used to identify devices and route network traffic between them.
TCP
Transmission Control Protocol. A connection-based protocol commonly used for SSH and web traffic.
DNS
Domain Name System. A service that translates human-readable domain names into IP addresses.
UDP
User Datagram Protocol. A lightweight connectionless protocol commonly used for faster or simpler network services.
UFW
Uncomplicated Firewall. A user-friendly front-end for managing Linux firewall rules on Ubuntu and Debian systems.
iptables
A Linux firewall rule system used to control how network traffic is allowed, blocked, or redirected.
nftables
A newer Linux firewall framework that replaces older packet-filtering systems such as iptables in many environments.
VPS
A hosted virtual machine that gives the administrator control over their own operating system environment.
Fail2ban
A log-parsing application that monitors system logs for repeated attacks and temporarily bans offending IP addresses.
Environment
This chapter assumes:
- Ubuntu Server or a similar Linux VPS
- OpenSSH available for remote administration
- UFW available as the local firewall layer
- Fail2ban available for repeated SSH abuse detection
- a normal user account for routine administration, with root-level commands reserved for maintenance or privileged changes
Basic SSH Setup
If OpenSSH is not already installed on the VPS, a simple Ubuntu setup is:
sudo apt update
sudo apt install openssh-server -y
sudo systemctl enable --now ssh
sudo systemctl status ssh --no-pager
If public-key authentication will be used, the key is usually generated on the administrator workstation, then copied to the VPS.
Recommended key type:
ssh-keygen -t ed25519 -C "your_email@example.com"
Compatibility fallback if ed25519 is not suitable:
ssh-keygen -t rsa -b 4096 -C "your_email@example.com"
This fallback mainly applies when ed25519 is not
suitable on the administrator laptop or in the target
environment. In practice, that usually means an older SSH client,
a legacy server setup, or a tool in the connection path that
still expects rsa compatibility.
Copy the public key to the VPS:
ssh-copy-id username@server-ip
Important note
ed25519andrsaare different key types2559 rsais not a valid SSH key type- for most modern Linux VPS setups,
ed25519is the better default
Risk
If inbound access is not controlled clearly, the server may expose unnecessary ports or remain more vulnerable to brute-force attempts. If hardening is done carelessly, the operator can break their own working access path.
That second risk matters just as much as the first. A useful defensive control applied in the wrong order can create downtime, confusion, and recovery work.
If the administrator breaks the working SSH access path, recovery should start from the hosting provider side rather than from guesswork on the public network. The safer practice is to take a VPS snapshot before risky hardening changes, then use the provider's web console, serial console, VNC, or raw terminal access if a lockout occurs.
That recovery path makes it possible to inspect firewall rules, restore access, or roll back changes without depending on the broken SSH session itself. In that recovery context, the administrator may need to sign in with the server's root account or use root-level commands through the provider console, but that should be treated as a maintenance and recovery action rather than the normal day-to-day administration model.
How Brute-Force Attacks Work
A brute-force attack against SSH is an automated attempt to guess valid login credentials by systematically trying combinations of usernames and passwords. Because SSH listens on a well-known port 22 and accepts password authentication by default, it presents a predictable target.
How an attacker implements it
-
Reconnaissance: The attacker scans the
internet for hosts with TCP port 22 open using tools such as
nmapor masscan. -
Dictionary preparation: The attacker compiles
lists of common usernames such as
root,admin,ubuntu, anduser, along with password lists from leaked credential databases or reused defensive and testing collections such asSecLists. -
Automated guessing: The tool opens SSH
connections to the target and attempts login combinations at
high speed.
hydra -l root -P /usr/share/wordlists/rockyou.txt ssh://203.0.113.45
This example is shown for defensive awareness only. It tells Hydra to try logging in as
rootusing every password in the wordlist against the target IP address. - Rate adaptation: More capable attackers may slow their attempts to evade simple rate limiting or distribute the attack across many IP addresses.
- Exploitation: If a valid credential is found, the attacker gains the same access level as that user, often root if the password belonged to the root account.
Why this matters for your baseline
A default SSH installation with password authentication enabled and no connection-rate limiting is vulnerable to this pattern within minutes of being internet-facing. Fail2ban addresses this by monitoring authentication logs, detecting repeated failures, and temporarily banning the source IP at the firewall level.
Main Discussion
The baseline used in the source case study is intentionally simple. The point is not to produce maximum complexity. The point is to establish a safer, verifiable order of operations.
First, review the current state before changing anything
Check the firewall state, review active TCP and UDP listeners, and confirm SSH availability before any tightening begins. If the operator does not know which ports are open, which services are listening, or which firewall rules are already in place, later validation becomes guesswork instead of proof.
Check the firewall state:
sudo ufw status verbose
Review active listeners:
sudo ss -tuln
The flags mean: -t TCP, -u UDP,
-l listening sockets only, and -n
numeric output without resolving service names.
Second, preserve SSH access before enforcing stricter controls
On a remotely managed VPS, SSH is often the only practical administration path. That means it must be explicitly allowed before the firewall is fully enforced.
Before proceeding
Ensure you have an alternative access method available, such as your hosting provider's web console, VNC, or IPMI.
Allow SSH through UFW:
sudo ufw allow OpenSSH
Using OpenSSH rather than 22/tcp is
preferred because it automatically adapts if the SSH port is
changed later. This is the difference between safe hardening and
self-created lockout.
Third, define default firewall behavior clearly
UFW needs explicit defaults so that unexpected traffic is handled predictably.
sudo ufw default deny incoming
sudo ufw default allow outgoing
These defaults ensure that inbound traffic not explicitly allowed is rejected, while normal outbound connections from the server continue to work.
Fourth, enable the firewall
sudo ufw enable
sudo ufw status verbose
Fifth, add repeated-attempt protection with Fail2ban
A firewall decides whether traffic may reach a service. Fail2ban adds another layer by detecting repeated failed SSH patterns and temporarily banning abusive sources.
Install Fail2ban if needed:
sudo apt update
sudo apt install fail2ban -y
Before starting Fail2ban, create a local configuration file.
Editing /etc/fail2ban/jail.conf directly is
discouraged because package updates will overwrite it.
sudo cp /etc/fail2ban/jail.conf /etc/fail2ban/jail.local
Edit jail.local to set safe defaults. At minimum,
add your own IP address to ignoreip to prevent
self-lockout during testing.
[DEFAULT]
ignoreip = 127.0.0.1/8 ::1 203.0.113.10
bantime  = 10m
findtime = 10m
maxretry = 5
Replace 203.0.113.10 with your actual public IP
address.
- ignoreip: addresses that will never be banned, including your current address and localhost
- bantime: how long an offending IP remains banned
- findtime: the time window during which repeated failures must occur
- maxretry: the number of failed attempts allowed before banning
Enable and start Fail2ban:
sudo systemctl enable --now fail2ban
Sixth, verify the state after the change
The point of a baseline is not only to apply controls, but to confirm that the server now reflects the intended defensive posture.
Execution Checklist
Practical Baseline Sequence
Use only on systems you own or administer with clear authorization. This sequence is the condensed execution checklist for the main discussion above.
Review state first
sudo ufw status verbose
sudo ss -tuln
sudo systemctl status ssh --no-pager
Preserve SSH access
sudo ufw allow OpenSSH
Set firewall defaults
sudo ufw default deny incoming
sudo ufw default allow outgoing
Enable the firewall
sudo ufw enable
sudo ufw status verbose
Enable Fail2ban
Follow the installation and jail.local setup shown
in the chapter text, then enable the service.
sudo systemctl enable --now fail2ban
Test a second SSH session
Open a second terminal and start a new SSH connection. Do not close the original session until the new connection succeeds.
Confirm the resulting state
Run the validation commands in the next section before closing the original SSH session.
Validation
Confirm the Baseline
These checks confirm whether the new baseline is active and whether SSH safety was preserved correctly.
Example Validation Commands
sudo ufw status verbose
sudo systemctl status fail2ban --no-pager
sudo fail2ban-client status
sudo fail2ban-client status sshd
sudo ss -tuln
Expected validation outcome
Firewall state
- UFW is active
- default policy is
deny (incoming)andallow (outgoing) - explicit SSH allowance is present
Fail2ban state
- Fail2ban is running
- the
sshdjail is active
Listener state
- no unexpected listeners are exposed
- the operator can still open a second working SSH session
Control Roles
What Each Control Is Doing
The baseline works because each control does a different job rather than pretending one tool solves the whole problem.
UFW
UFW is the inbound traffic control layer. It sits on top of the
kernel's netfilter framework such as iptables or
nftables and provides a readable interface for
deciding which network traffic may reach server services.
In this baseline, UFW moves the system away from unclear exposure and toward explicit access control.
Fail2ban
Fail2ban is the repeated-abuse reduction layer. It monitors log
files such as /var/log/auth.log for automated attack
patterns and temporarily blocks the offending IP address.
It does not prevent the first few attempts, but it makes sustained brute-force abuse far less frictionless.
OpenSSH preservation
This is the operator-safety layer. Preserving SSH before tightening firewall rules keeps the administration path alive while the system is being hardened.
The test-second-session rule ensures that a working fallback still exists before the original session is closed.
Result
The server moves from loose default exposure toward explicit inbound control and repeatable SSH protection. This does not complete the full security program, but it establishes a baseline worth keeping.
What to Remember
Baseline hardening is not a one-command event. It is a short sequence with immediate verification after each step.
For a small platform, that discipline matters more than complexity. A simple baseline that is clearly understood, deliberately applied, and routinely verified is more valuable than a larger hardening plan that nobody can safely operate.
Next Steps
This chapter establishes a minimal baseline. Consider these follow-up actions for stronger SSH security once recovery paths are in place and each change can be tested safely.
- Disable root login: set
PermitRootLogin noin/etc/ssh/sshd_configand use a dedicated unprivileged user withsudoprivileges instead - Switch to key-based authentication: disable password authentication with
PasswordAuthentication noand require SSH public-key authentication - Change the SSH port: not as a primary defense, but to reduce noise from automated scanners if the operational model supports it
- Consider IPv6: verify that firewall rules cover both IPv4 and IPv6 if the VPS exposes both
These steps are beyond the scope of this baseline because they carry higher lockout risk. Apply them only after the current baseline is stable and your recovery path has been tested.